EggJS
Midway 可以使用 EggJS 作为上层 Web 框架,EggJS 提供了非常��多常用的插件和 API,帮助用户快速构建企业级 Web 应用。本章节内容,主要介绍 EggJS 在 Midway 中如何使用自身的能力。
依赖包
针对 EggJS,Midway 提供了 @midwayjs/web 包进行了适配,在其中提供了 Midway 特有的依赖注入、切面等能力。
针对 EggJS 场景,这些包列举如下。
  "dependencies": {
    "@midwayjs/web": "^2.3.11",
    "@midwayjs/decorator": "^2.3.11",
    "egg": "^2.0.0",
    "egg-scripts": "^2.10.0",
    "midway": "^2.3.11"
  },
  "devDependencies": {
    "@midwayjs/egg-ts-helper": "^1.0.1",
  },
| @midwayjs/web | 必须,Midway EggJS 适配层 |
|---|---|
| @midwayjs/decorator | 必须,Midway 系列通用的装饰器包 |
| midway | 可选,Midway 启动适配包,提供了 midway v1 兼容 |
| egg | 必须,EggJS 依赖包,提供定义等其他能力 |
| egg-scripts | 可选,EggJS 启动脚本 |
| @midwayjs/egg-ts-helper | 可选,EggJS 定义生成工具 |
和默认 EggJS 的不同之处
- 1、默认关闭 static 插件,需要时请自行开启
- 2、baseDir 默认调整为
src目录,服务器上为dist目录
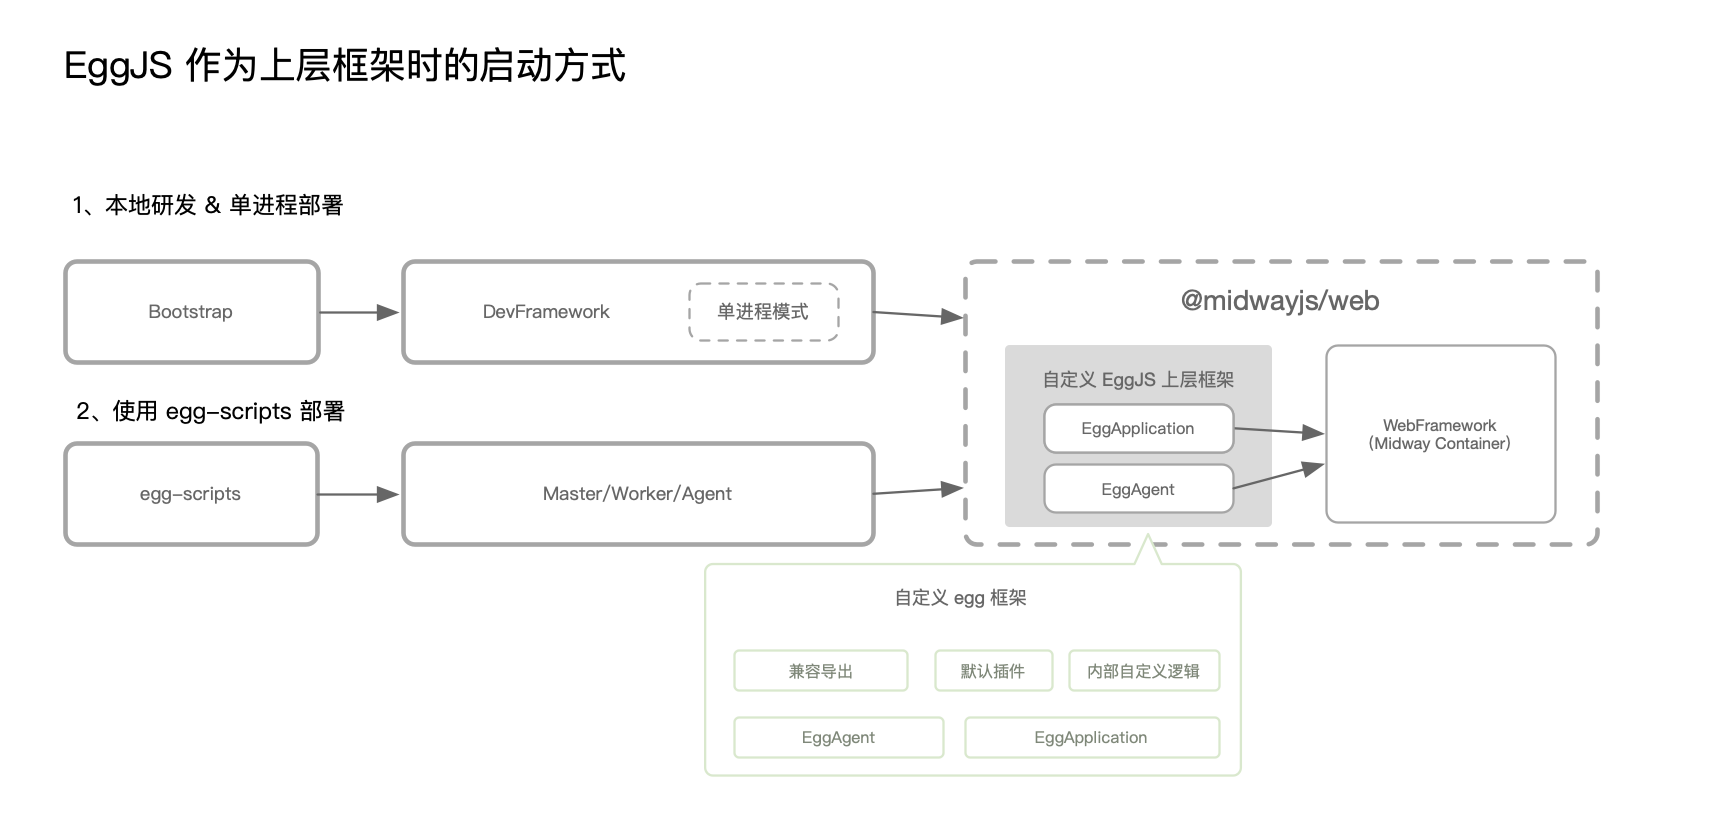
整个架构如下:
目录结构
除了 Midway 提供的目录结构外,EggJS 还有一些特殊的目录结构(不可变),整个结构如下。
➜  my_midway_app tree
.
├── src
|   ├── app.ts 										 				## EggJS 扩展 Worker 生命周期文件(可选)
|   ├── agent.ts								   				## EggJS 扩展 Agent 生命周期文件(可选)
|   ├── app																## EggJS 固定的根目录(可选)
|   │   ├── public		 								  	## EggJS 静态托管插件的默认目录(可配)
|   │   |   └── reset.css
|   │   ├── view (可选)										 ## EggJS 模板渲染的默认目录(可配)
|   │   |   └── home.tpl
|   │   └── extend (可选)									 ## EggJS 扩展目录(可配)
|   │       ├── helper.ts (可选)
|   │       ├── request.ts (可选)
|   │       ├── response.ts (可选)
|   │       ├── context.ts (可选)
|   │       ├── application.ts (可选)
|   │       └── agent.ts (可选)
|   │
|   ├── config
|   |   ├── plugin.ts
|   |   ├── config.default.ts
|   │   ├── config.prod.ts
|   |   ├── config.test.ts (可选)
|   |   ├── config.local.ts (可选)
|   |   └── config.unittest.ts (可选)
│   ├── controller								 				## Midway 控制器目录(推荐)
│   ├── service								     				## Midway 服务目录(推荐)
│   └── schedule									 				## Midway 定时器目录(推荐)
│
├── typings                        				## EggJS 定义生成目录
├── test
├── package.json
└── tsconfig.json
以上是 EggJS 的目录结构全貌,其中包含了很多 EggJS 特有的目录,有一些在 Midway 体系中已经有相应的能力替代,可以直接替换。整个结构,基本上等价于将 EggJS 的目录结构移动到了 src 目录下。
由于 EggJS 是基于约定的框架,整个工程的目录结构是固定的,这里列举一些常用的约定目录。
src/app/public/** | 用于放置静态资源,可选,具体参见内置插件 egg-static。 |
|---|---|
src/config/config.{env}.ts | 用于编写配置文件,具体参见配置。 |
src/config/plugin.js | 用于配置需要加载的插件,具体参见插件。 |
test/** | 具体参见单元测试。 |
src/app.js 和 src/agent.js | 用于自定义启动时的初始化工作,可选,具体参见启动自定义。关于agent.js的作用参见Agent 机制。 |
配置定义
Midway 在脚手架中提供了标准的 EggJS 的 TS 配置写法,其中包括了完整的定义和属性提示,结构如下。
// src/config/config.default.ts

import { EggAppConfig, EggAppInfo, PowerPartial } from 'egg';

export type DefaultConfig = PowerPartial<EggAppConfig>;

export default (appInfo: EggAppInfo) => {
  const config = {} as DefaultConfig;

  // use for cookie sign key, should change to your own and keep security
  config.keys = appInfo.name + '_1600001669991_8079';

  // add your middleware here
  config.middleware = [];

  config.security = {
    csrf: {
      enable: false,
    },
  };

  config.sequelize = {};

  return config;
};
通过这样返回方法的形式,�在运行期会被自动执行,合并进完整的配置对象。
这个函数的参数为 EggAppInfo 类型,值为以下内容。
| appInfo | 说明 |
|---|---|
| pkg | package.json |
| name | 应用名,同 pkg.name |
| baseDir | 应用代码的 src (本地开发)或者 dist (上线后)目录 |
| appDir | 应用代码的目录 |
| HOME | 用户目录,如 admin 账户为 /home/admin |
| root | 应用根目录,只有在 local 和 unittest 环境下为 baseDir,其他都为 HOME。 |
注意,这里的 baseDir 和 appDir 和 EggJS 应用有所区别。
插件
插件是 EggJS 的特色之一,Midway 也支持 EggJS 的插件体系。
开启插件
插件一般通过 npm 模块的方式进行复用。
$ npm i egg-mysql --save
然后需要在应用或框架的 src/config/plugin.js 中声明开启。
如果有 export default ,请写在其中。
import { EggPlugin } from 'egg';
export default {
  static: false, // default is true
  mysql: {
    enable: true,
    package: 'egg-mysql',
  },
} as EggPlugin;
如果没有 export default ,可以直接导出。
// src/config/plugin.ts
// 使用 mysql 插件
export const mysql = {
  enable: true,
  package: 'egg-mysql',
};
使用插件
在开启插件之后,我们就可以在业务代码中使用插件提供的功能了。一般来说,插件会将对象挂载到 EggJS 的 app 和 ctx 之上,然后直接使用。
app.mysql.query(sql, values); // egg 提供的方法
在 Midway 中可以通过 @App 获取 app 对象��,以及在请求作用域中通过 @Inject() ctx 获取 ctx 对象,所以我们可以通过注入来获取插件对象。
import { Provide, Inject, Get } from '@midwayjs/decorator';
import { Application, Context } from 'egg';

@Provide()
export class HomeController {
  @App()
  app: Application;

  @Inject()
  ctx: Context;

  @Get('/')
  async home() {
    this.app.mysql.query(sql, values); // 调用 app 上的方法(如果有的话)
    this.ctx.mysql.query(sql, values); // 调用挂载在 ctx 上的方法(如果有的话)
  }
}
此外,还可以通过 @Plugin 装饰器来直接注入 app 挂载的插件,默认情况下,如果不传参数,将以属性�名作为 key。
import { Provide, Get, Plugin } from '@midwayjs/decorator';

@Provide()
export class HomeController {
  @Plugin()
  mysql: any;

  @Get('/')
  async home() {
    this.mysql.query(sql, values);
  }
}
@Plugin() mysql 等价于 app.mysql 。 @Plugin 的作用就是从 app 对象上拿对应属性名的插件,所以 @Plugin() xxx 就等于 app['xxx'] 。
Web 中间件
一般情况下,我们会在 src/middleware 文件夹中编写 Web 中间件,比如创建一个 src/middleware/report.ts 。我们在这个 Web 中间件中打印了控制器(Controller)执行的时间。
➜  my_midway_app tree
.
├── src
│   ├── controller
│   │   ├── user.ts
│   │   └── home.ts
│   ├── interface.ts
│   ├── middleware                   ## 中间件目录
│   │   └── report.ts
│   └── service
│       └── user.ts
├── test
├── package.json
└── tsconfig.json
简单来说, await next() 则代表了下一个要执行的逻辑,这里一般代表控制器执行,在执行的前后,我们可以进行一些打印和赋值操作,这也是洋葱圈模型最大的优势。
import { Provide } from '@midwayjs/decorator';
import { IWebMiddleware, IMidwayWebNext } from '@midwayjs/web';
import { Context } from 'egg';

@Provide()
export class ReportMiddleware implements IWebMiddleware {
  resolve() {
    return async (ctx: Context, next: IMidwayWebNext) => {
      const startTime = Date.now();
      await next();
      console.log(Date.now() - startTime);
    };
  }
}
注意,如果要继续使用 EggJS 传统的函数式写法,必须将文件放在 src/app/middleware 下。
配置全局中间件
在 EggJS 中,除了上面提到的全局中间件使用方法外,其提供了一个更为配置性的加载全局中间件的用法。在 src/config/config.default.ts 中配置 middleware 属性即可定义全局中间件,同样的,指定全局中间件的 key 即可。
// src/config/config.default.ts

export default (appInfo: EggAppInfo) => {
  const config = {} as DefaultConfig;

  // ...

  config.middleware = ['reportMiddleware'];

  return config;
};
配置路由中间件
按照 Midway 的通用的配置在路由装饰器即可。
import { Controller, Get, Provide } from '@midwayjs/decorator';

@Provide()
@Controller('/', { middleware: ['reportMiddleware'] }) // controller 级别的中间件
export class HomeController {
  @Get('/', { middleware: ['reportMiddleware'] }) // 路由级别的中间件
  async home() {}
}
关于 Match 和 Ignore
EggJS 的中间件支持在 config 中配置 match 和 ignore ,在 Midway 中,这一特性只会对 EggJS 自己的中间件生效,即只对 src/app/middleware 里的函数写法生效。
模板渲染
EggJS 默认的 egg-view 提供默认渲染的能力,他默认的模板目录为 app/view ,在 Midway 中目前没有对此做调整,所以相应的,view 目录需要放在 src/app/view 下。
如果目录结构不是很喜欢,可以在配置中修改。
// src/config/config.default.ts

module.exports = (appInfo) => {
  return {
    view: {
      root: path.join(appInfo.baseDir, 'view'),
    },
  };
};
文件上传
Egg.js 使用 egg-multipart 插件进行文件上传处理。
File 模式
在 config 文件中启用 file 模式:
// src/config/config.default.ts
exports.multipart = {
  mode: 'file',
};
1、上传 / 接收文件
你的前端静态页面代码类似如下:
<form method="POST" action="/api/upload?_csrf={{ ctx.csrf | safe }}" enctype="multipart/form-data">
  title: <input name="title" />
  file: <input name="file" type="file" />
  <button type="submit">Upload</button>
</form>
// controller/upload.ts
const fs = require('mz/fs');
import { basename } from 'path';
import { Context } from 'egg';

@Controller('/api')
export class ApiController {
  @Inject()
  ctx: Context;

  @Post('/upload')
  async uplaodFile() {
    const file = this.ctx.request.files[0];
    const name = 'egg-multipart-test/' + basename(file.filename);
    let result;
    try {
      // 处理文件,比如上传到云端
      result = await this.ctx.oss.put(name, file.filepath);
    } finally {
      // 需要删除临时文件
      await fs.unlink(file.filepath);
    }

    return {
      url: result.url,
      // 获取所有的字段值
      requestBody: ctx.request.body,
    };
  }
}
2、上传 / 接收多个文件:
对于多个文件,我们借助 ctx.request.files 属性进行遍历,然后分别进行处理:
你的前端静态页面代码应该看上去如下样子:
<form method="POST" action="/api/upload?_csrf={{ ctx.csrf | safe }}" enctype="multipart/form-data">
  title: <input name="title" />
  file1: <input name="file1" type="file" />
  file2: <input name="file2" type="file" />
  <button type="submit">Upload</button>
</form>
对应的后端代码:
// controller/upload.ts
const fs = require('mz/fs');
import { basename } from 'path';
import { Context } from 'egg';

@Controller('/api')
export class ApiController {
  @Inject()
  ctx: Context;

  @Post('/upload')
  async uplaodFile() {
    console.log('got %d files', this.ctx.request.files.length);
    for (const file of this.ctx.request.files) {
      console.log('field: ' + file.fieldname);
      console.log('filename: ' + file.filename);
      console.log('encoding: ' + file.encoding);
      console.log('mime: ' + file.mime);
      console.log('tmp filepath: ' + file.filepath);
      let result;
      try {
        // 处理文件,比如上传到云端
        result = await this.ctx.oss.put('egg-multipart-test/' + file.filename, file.filepath);
      } finally {
        // 需要删除临时文件
        await fs.unlink(file.filepath);
      }
      console.log(result);
    }

    return {
      url: result.url,
      // 获取所有的字段值
      requestBody: ctx.request.body,
    };
  }
}
除了简单的文件上传,还有更加复杂的流式上传,可以参考 egg 文件上传。
静态文件
请使用 egg 自带的静态方案:https://eggjs.org/zh-cn/tutorials/assets.html。
定时任务
midway 的定时任务是基于 egg 定时任务 提供了更多 TypeScript 以及装饰器方面的支持。
编写代码
定时任务一般存放在 src/schedule 目录下,可以配置定时任务的属性和要执行的方法。例如:
// src/schedule/hello.ts
import { Provide, Inject, Schedule, CommonSchedule } from '@midwayjs/decorator';
import { Context } from 'egg';

@Provide()
@Schedule({
  interval: 2333, // 2.333s 间隔
  type: 'worker', // 指定某一个 worker 执行
})
export class HelloCron implements CommonSchedule {
  @Inject()
  ctx: Context;

  // 定时执行的具体任务
  async exec() {
    this.ctx.logger.info(process.pid, 'hello');
  }
}
推荐使用 CommonSchedule 接口来规范你的计划任务类。
请不要放到 src/app/schedule 中,会和 egg 本身的加载冲突。
手动调用
EggJS 提供了 app.runSchedule 方法来测试计划任务,这个方法在 Midway 下做了特殊处理,参数的格式变为 id#className ,id 为依赖注入的标识符(类名的驼峰)。
示例如下:
app.runSchedule('helloCron#HelloCron');
当然,也可以使用 Midway 自身的动态获取实例的方式。
const helloCron = await ctx.requestContext.getAsync<HelloCron>('helloCron');
await helloCron.exec();
日志
默认情况下,在 Midway 中使用 @mdwayjs/logger,文档请参考日志章节。在使用 egg-logger 的情况下,可以参考这里或者直接访问 egg 文档。
自定义日志
比如自定义一个日志 myLogger,这个时候,日志的 key 则为 myLogger 。
module.exports = (appInfo) => {
  return {
    customLogger: {
      myLogger: {
        file: path.join(appInfo.root, 'logs/xx.log'),
      },
    },
  };
};
这个时候可以用 @Logger 装饰器来获取日志实例。
import { Provide, Logger } from '@midwayjs/decorator';

@Provide()
export class BaseService {
  @Logger('myLogger')
  logger;
}
日志等级
默认情况下,EggJS 的日志等级均为 WARN ,我们可以修改 EggJS 默认的日志等级覆盖这一行为。
// src/config/config.local.ts
export const logger = {
  consoleLevel: 'INFO',
  coreLogger: {
    consoleLevel: 'INFO',
  },
};
默认日志名
Midway 对 EggJS 默认的日志文件名做了修改。
midway-core.log框架输入日志midway-web.log应用输出日志midway-agent.logagent 中输出的日志common-error.log统一的错误输出日志
服务器日志
EggJS 默认开启了日志清理,日志文件最多保存一个月,要修改这一行为,可以进行配置。
// config.default.ts
exports.logrotator = {
  // for clean_log
  maxDays: 0,
};
异常处理
EggJS 框架通过 onerror 插件提供了统一的错误处理机制。对一个请求的所有处理方法(Middleware、Controller、Service)中抛出的任何异常都会被它捕获,并自动根据请求想要获取的类型返回不同类型的错误(基于 Content Negotiation)。
| 请求需求的格式 | 环境 | errorPageUrl 是否配置 | 返回内容 |
|---|---|---|---|
| HTML & TEXT | local & unittest | - | onerror 自带的错误页面,展示详细的错误信息 |
| HTML & TEXT | 其他 | 是 | 重定向到 errorPageUrl |
| HTML & TEXT | 其他 | 否 | onerror 自带的没有错误信息的简单错误页(不推荐) |
| JSON & JSONP | local & unittest | - | JSON 对象或对应的 JSONP 格式响应,带详细的错误信息 |
| JSON & JSONP | 其他 | - | JSON 对象或对应的 JSONP 格式响应,不带详细的错误信息 |
errorPageUrl
onerror 插件的配置中支持 errorPageUrl 属性,当配置了 errorPageUrl 时,一旦用户请求线上应用的 HTML 页面异常,就会重定向到这个地址。
在 src/config/config.default.ts 中
// src/config/config.default.ts
module.exports = {
  onerror: {
    // 线上页面发生异常时,重定向到这个页面上
    errorPageUrl: '/50x.html',
  },
};
自定义统一异常处理
尽管框架提供了默认的统一异常处理机制,但是应用开发中经常需要对异常时的响应做自定义,特别是在做一些接口开发的时候。框架自带的 onerror 插件支持自定义配置错误处理方法,可以覆盖默认的错误处理方法。
// src/config/config.default.ts
export const onerror = {
  all(err, ctx) {
    // 在此处定义针对所有响应类型的错误处理方法
    // 注意,定义了 config.all 之后,其他错误处理方法不会再生效
    ctx.body = 'error';
    ctx.status = 500;
  },
  html(err, ctx) {
    // html hander
    ctx.body = '<h3>error</h3>';
    ctx.status = 500;
  },
  json(err, ctx) {
    // json hander
    ctx.body = { message: 'error' };
    ctx.status = 500;
  },
  jsonp(err, ctx) {
    // 一般来说,不需要特殊针对 jsonp 进行错误定义,jsonp 的错误处理会自动调用 json 错误处理,并包装成 jsonp 的响应格式
  },
};
404
框架并不会将服务端返回的 404 状态当做异常来处理,但是框架提供了当响应为 404 且没有返回 body 时的默认响应。
当请求被框架判定为需要 JSON 格式的响应时,会返回一段 JSON:
{ "message": "Not Found" }
当请求被框架判定为需要 HTML 格式的响应时,会返回一段 HTML:
<h1>404 Not Found</h1>
框架支持通过配置,将默认的 HTML 请求的 404 响应重定向到指定的页面。
// src/config/config.default.ts
export const notfound = {
  pageUrl: '/404.html',
};
自定义 404 响应
在一些场景下,我们需要自定义服务器 404 时的响应,和自定义异常处理一样,我们也只需要加入一个中间件即可对 404 做统一处理。
// src/middleware/notfound_handler.ts

import { Provide } from '@midwayjs/decorator';

@Provide('notfoundHandler')
export class NotFoundHandlerMiddleware {
  resolve() {
    return async function notFoundHandler(ctx, next) {
      await next();
      if (ctx.status === 404 && !ctx.body) {
        if (ctx.acceptJSON) {
          ctx.body = { error: 'Not Found' };
        } else {
          ctx.body = '<h1>Page Not Found</h1>';
        }
      }
    };
  }
}
然后在配置中引入中间件。
// src/config/config.default.ts
export const middleware = ['notfoundHandler'];
不存在定义的问题
一些 egg 插件未提供 ts 定义,导致使用会出现未声明方法的情况,比如 egg-mysql。

可以使用 any 绕过。
await(this.app as any).mysql.query(sql);
或者可以自行增加扩展定义。
扩展 Application/Context/Request/Response
增加扩展文件
虽然 MidwayJS 并不希望直接将属性挂载到 koa 的 Context,App 上(会造成管理和定义的不确定性),但是 EggJS 的这项功能依旧可用。
文件�位置如下。
➜  my_midway_app tree
.
├── src
│   ├── app
│   │   └── extend
│   │       ├── application.ts
│   │       ├── context.ts
│   │       ├── request.ts
│   │       └── response.ts
│   ├── config
│   └── interface.ts
├── test
├── package.json
└── tsconfig.json
内容和原来的 EggJS 相同。
// src/app/extend/context.ts
export default {
  get hello() {
    return 'hello world';
  },
};
增加扩展定义
扩展了 EggJS 之后,你需要增加扩展的定义。请在 src/interface.ts 中扩展增加的 ctx.hello 属性。
// src/interface.ts
declare module 'egg' {
  interface Context {
    hello: string;
  }
}
业务自定义扩展的定义请 不要放在根目录 typings 下,避免被 ts-helper 工具覆盖掉。
除此之外,还可以扩展其他的定义,MidwayJS 的相关方法也是如此支持的。
declare module 'egg' {
  interface EggAppInfo {
    // 扩展 eggInfo
    appDir: string;
  }

  interface Application {
    // 扩展 Application
    applicationContext: IMidwayContainer;
    getBaseDir(): string;
    getAppDir(): string;
    getEnv(): string;
    getFrameworkType(): MidwayFrameworkType;
    getProcessType(): MidwayProcessTypeEnum;
    getApplicationContext(): IMidwayContainer;
    getConfig(key?: string): any;
    generateController?(controllerMapping: string);
    generateMiddleware?(middlewareId: string): Promise<Middleware<DefaultState, IMidwayKoaContext>>;
  }

  interface Context {
    // 扩展 Context
    requestContext: IMidwayContainer;
  }
}
框架启动参数
@midwayjs/web 框架的启动参数如下:
| port | number | 必填,启动的端口 | | -------- | ------- | ---------------------------- | ------------ | ------- | --------------------- | | key | string | Buffer | Array<Buffer | Object> | 可选,HTTPS 证书 key | | cert | string | Buffer | Array<Buffer | Object> | 可选,HTTPS 证书 cert | | ca | string | Buffer | Array<Buffer | Object> | 可选,HTTPS 证书 ca | | hostname | string | 监听的 hostname,默认 127.1 | | http2 | boolean | 可选,http2 支持,默认 false |
这些参数在使用 bootstrap.js 启动时生效。
常见问题
默认的 csrf 错误
在 post 请求,特别是第一次时用户会发现一个 csrf 报错。原因是 egg 在框架中默认内置了安全插件 egg-security, 默认开启了 csrf 校验。
我们可以在配置中关闭它,但是更好的是去了解它之后再做选择。
export const security = {
  csrf: false,
};
其他
生成 ts 定义
Midway 提供了 @midwayjs/egg-ts-hepler 工具包,用于快速生成 EggJS 开发时所依赖的定义。
npm install @midwayjs/egg-ts-helper --save-dev
在 package.json 中加入对应的 ets 命令即可,一般来说,我们会在 dev 命令前加入,以保证代码的正确性。
  "scripts": {
    "dev": "cross-env ets && cross-env NODE_ENV=local midway-bin dev --ts",
  },
在第一次编写代码前,需要执行一次此命令才能有 ts 定义生成。
EggJS 生成的定义在 typings 目录中。
➜  my_midway_app tree
.
├── src                            ## midway 项目源码
├── typings                        ## EggJS 定义生成目录
├── test
├── package.json
└── tsconfig.json
EggJS 中 Configuration 的特殊情况
在 EggJS 下, configuration.ts 中的生命周期只会在 worker 下加载执行。如果在 Agent 有类似的需求,请直接使用 EggJS 自身的 agent.ts 处理。