Swagger
基于最新的 OpenAPI 3.0.3 实现了新版的 Swagger 组件。
相关信息:
| 描述 | |
|---|---|
| 可用于标准项目 | ✅ |
| 可用于 Serverless | ❌ |
| 可用于一体化 | ❌ |
| 包含独立主框架 | ❌ |
| 包含独立日志 | ❌ |
安装依赖
$ npm install @midwayjs/swagger@3 --save
$ npm install swagger-ui-dist --save-dev
如果想要在服务器上输出 Swagger API 页面,则需要将 swagger-ui-dist 安装到依赖中。
$ npm install swagger-ui-dist --save
或者在 package.json 中增加如下依赖后,重新安�装。
{
  "dependencies": {
    "@midwayjs/swagger": "^3.0.0",
    // 如果你希望在服务器上使用
    "swagger-ui-dist": "^4.2.1",
    // ...
  },
  "devDependencies": {
    // 如果你不希望在服务器上使用
    "swagger-ui-dist": "^4.2.1",
    // ...
  }
}
开启组件
在 configuration.ts 中增加组件。
import { Configuration } from '@midwayjs/core';
import * as swagger from '@midwayjs/swagger';

@Configuration({
  imports: [
    // ...
    swagger
  ]
})
export class MainConfiguration {

}
可以配置启用的环境,比如下面的代码指的是 只在 local 环境下启用。
import { Configuration } from '@midwayjs/core';
import * as swagger from '@midwayjs/swagger';

@Configuration({
  imports: [
    // ...
    {
      component: swagger,
      enabledEnvironment: ['local']
    }
  ]
})
export class MainConfiguration {

}
然后启动项目,访问地址:
路径可以通过 swaggerPath 参数配置。
数据类型
自动类型提取
Swagger 组件会识别各个 @Controller 中每个路由方法的 @Body()、@Query()、@Param() 装饰器,提取路由方法参数和类型。
比如下面的代码:
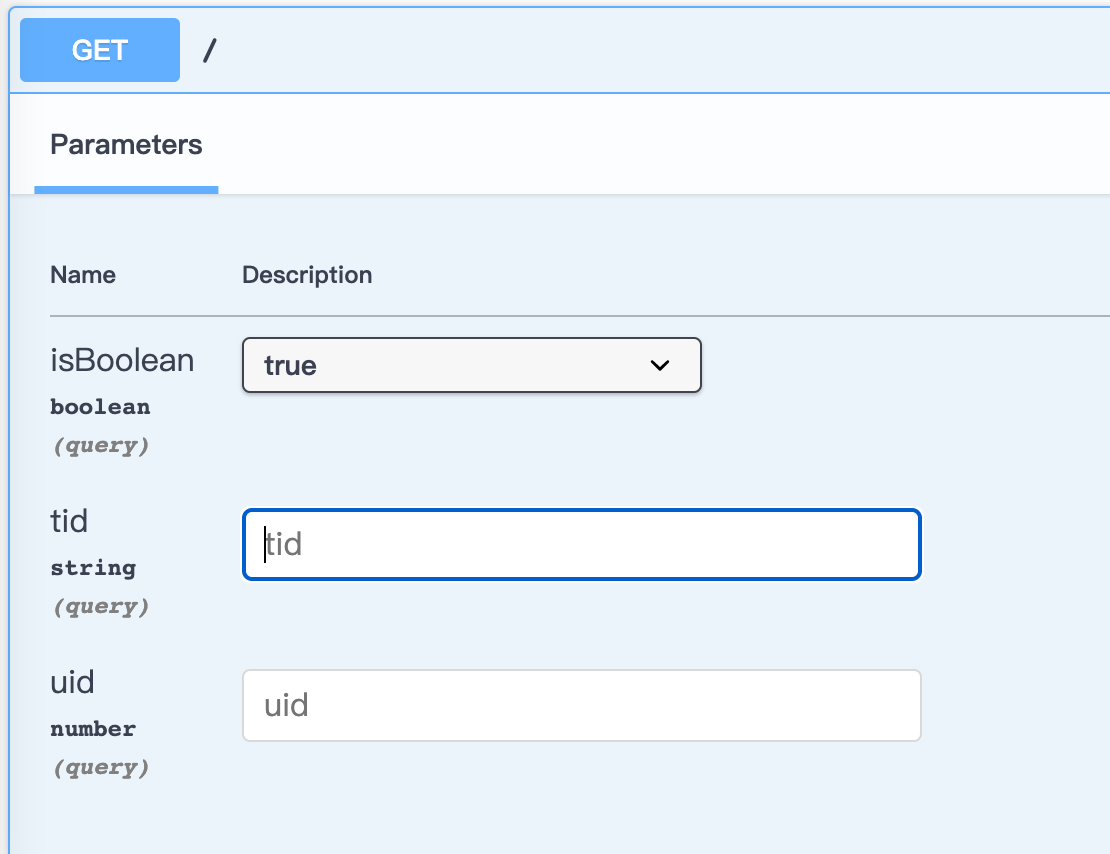
@Get('/')
async home(
  @Query('uid') uid: number,
  @Query('tid') tid: string,
  @Query('isBoolean') isBoolean: boolean,
) {
    // ...
}
基础的布尔,字符串,数字类型展示效果如下:
类型和 Schema
我们常在参数使用对象,并使用定义好的类作为类型,这个时候 swagger 组件也能自动识别,同时也能和普通的类型进行组合识别。
比如下面的代码:
@Post('/:id', { summary: 'test'})
async create(@Body() createCatDto: CreateCatDto, @Param('id') id: number) {
  // ...
}
CreateCatDto 类型的定义如下,我们使用 ApiProperty 将其中的每个属性都进行了定义。
import { ApiProperty } from "@midwayjs/swagger";

export class CreateCatDto {
  @ApiProperty({ example: 'Kitty', description: 'The name of the Catname'})
  name: string;

  @ApiProperty({ example: '1', description: 'The name of the Catage'})
  age: number;

  @ApiProperty({ example: 'bbbb', description: 'The name of the Catbreed'})
  breed: string;
}
效果如下,组件会自动提取其中的两个参数:
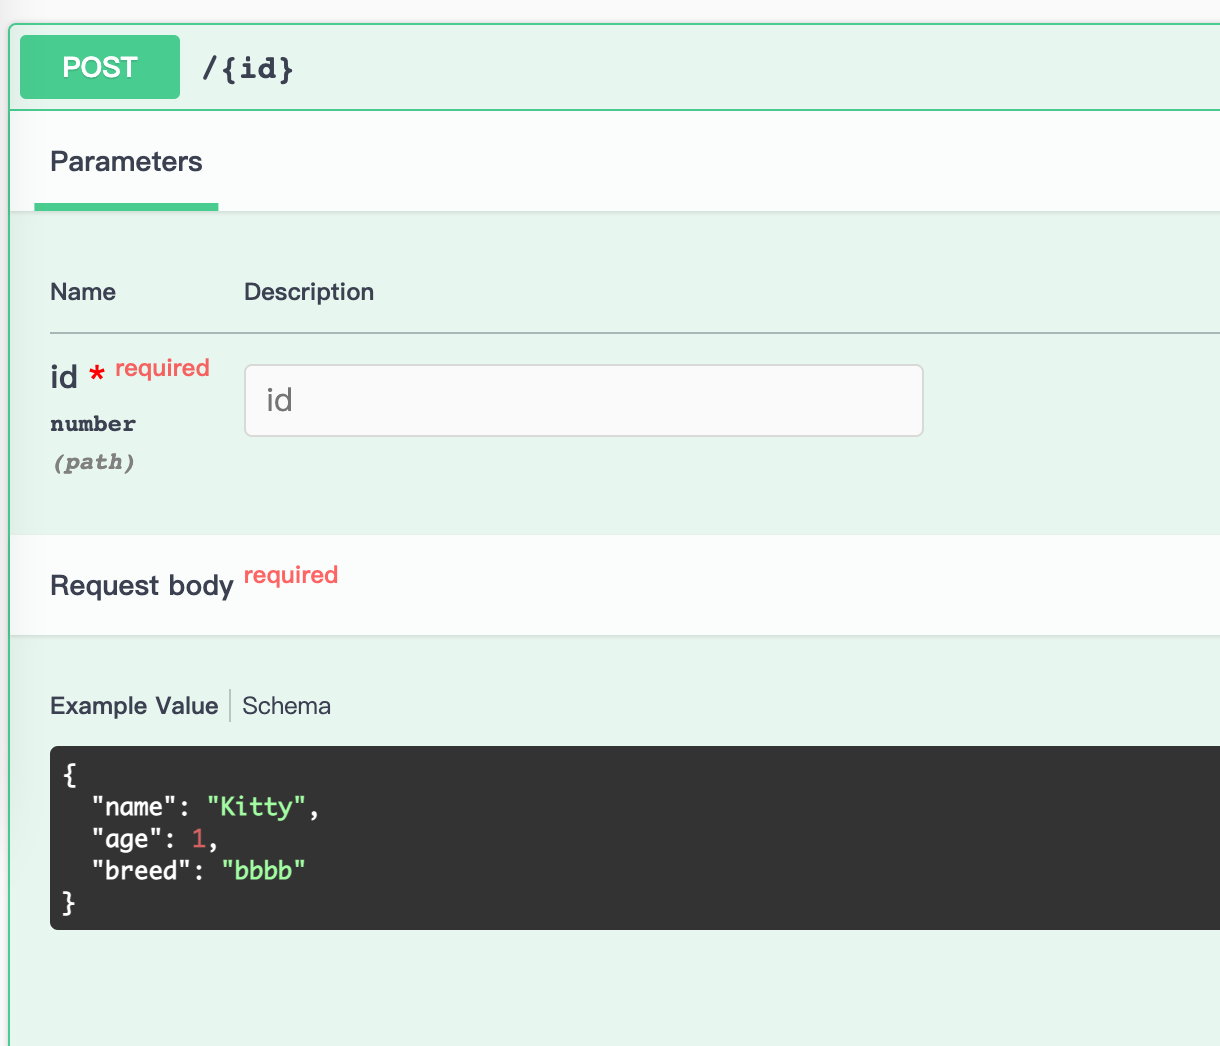
同时,由于在类中定义了每个属性的 example,会自动填入示例值。
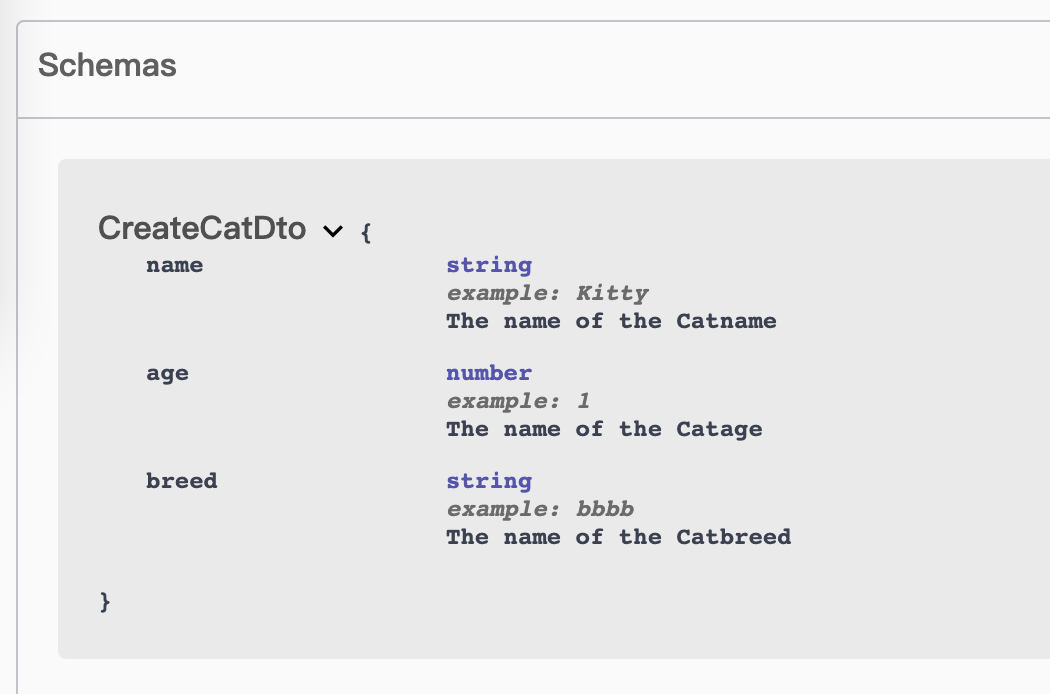
在 Swagger 中,每个类型都会有一个 Schema 来描述,我们已经定义了一个 CreateCatDto 的 Schema,看起来就像是下面的样子。
注意,我们会重复用到这些 Schema。
基础类型
通过给 @ApiProperty(...) 装饰器中设置 type,我们可以定义常见的类型。
大多数情况下,基础类型无需显式声明 type ,可自动识别。
字符串
@ApiProperty({
  type: 'string',
  // ...
})
name: string;
布尔类型
@ApiProperty({
  type: 'boolean',
  example: 'true',
  // ...
})
isPure: boolean;
数字类型
@ApiProperty({
  type: 'number',
  example: '1',
  description: 'The name of the Catage'
})
age: number;
此外,也可以使用 format 字段来定义更为精确的长度。
@ApiProperty({
  type: 'integer',
  format: 'int32',
  example: '1',
  description: 'The name of the Catage'
})
age: number;
数组类型
如果是数组类型,我们可以配置 type 字段来定义,同时通过 items 的 type 来指定类型。
@ApiProperty({
  type: 'array',
  items: {
    type: 'string',
  },
  example: ['1'],
  description: 'The name of the Catage'
})
breeds: string[];
枚举类型
如果是枚举类型,可以通过配置 enmu 字段来定义。
enum HelloWorld {
  One = 'One',
  Two = 'Two',
  Three = 'Three',
}

@ApiProperty({
  enum: ['One', 'Two', 'Three'],
  description: 'The name of the Catage'
})
hello: HelloWorld;
如果该字段在最顶层,展示效果如下:

复杂对象类型
如果某个属性的类型是个现有的复杂类型,我们可以使用 type 来指定这个复杂的类型。
export class Cat {
  /**
   * The name of the Catcomment
   * @example Kitty
   */
  @ApiProperty({ example: 'Kitty', description: 'The name of the Cat'})
  name: string;

  @ApiProperty({ example: 1, description: 'The age of the Cat' })
  age: number;

  @ApiProperty({ example: '2022-12-12 11:11:11', description: 'The age of the CatDSate' })
  agedata?: Date;

  @ApiProperty({
    example: 'Maine Coon',
    description: 'The breed of the Cat',
  })
  breed: string;
}

export class CreateCatDto {

  // ...

  @ApiProperty({
    type: Cat,	// 这里无需指定 example
  })
  related: Cat;
}
效果如下:

复杂对象数组类型
如果某个属性的类型是个复杂的数组类型,写法略有不同。
首先type 必须声明为 array,除了设置type,我们还可以使用 getSchemaPath 方法额外导入一个不同的类型(上面的复杂对象也可以使用它设置$ref)。
此外,如果 Cat 类型没有在其他属性的 type 字段中声明过,需要使用 @ApiExtraModel 装饰器额外声明引入外部类型。
import { ApiProperty, getSchemaPath, ApiExtraModel } from '@midwayjs/swagger';

class Cat {
  // ...
}

@ApiExtraModel(Cat)
export class CreateCatDto {
  // ...

  @ApiProperty({
    type: 'array',
    items: {
      $ref: getSchemaPath(Cat),
    }
  })
  relatedList: Cat[];
}
效果如下:

循环依赖
当类之间具有循环依赖关系时,请使用惰性函数提供类型信息。
比如 type 字段的循环。
class Photo {
  // ...
  @ApiProperty({
    type: () => Album
  })
  album: Album;
}
class Album {
  // ...
  @ApiProperty({
    type: () => Photo
  })
  photo: Photo;
}
getSchemaPath 也可以使用。
export class CreateCatDto {
  // ...

  @ApiProperty({
    type: 'array',
    items: {
      $ref: () => getSchemaPath(Cat)
    }
  })
  relatedList: Cat[];
}
请求定义
OpenAPI 定义的 paths 就是各个路由路径,且每个路由路径都有 HTTP 方法的定义,比如 GET、POST、DELETE、PUT 等。
Query 定义
使用 @ApiQuery 来定义 Query 数据。
基础使用,会自动识别 @Query 装饰器。
@Get('/get_user')
async getUser(@Query('name') name: string) {
  return 'hello';
}
如果 @Query 以对象形式,需要在 @ApiQuery 指定一个 name 参数,对象类型需要配合 @ApiProperty 使用,否则表单会变为只读形式。
export class UserDTO {
  @ApiProperty()
  name: string;
}

@Get('/get_user')
@ApiQuery({
  name: 'query'
})
async getUser(@Query() dto: UserDTO) {
  // ...
}
Body 定义
使用 @ApiBody 来定义 Body 数据。
@Body 对象类型需要配合 @ApiProperty 使用。
export class UserDTO {
  @ApiProperty()
  name: string;
}

@Post('/update_user')
async upateUser(@Body() dto: UserDTO) {
  // ...
}
如需其他细节,请使用 @ApiBody 增强。
注意,Swagger 规定,Body 定义只能存在一个,如果配置了 @ApiBody ,则类型提取的数据会自动被覆盖。
比如下面示例中,Body 的类型会被替换为 Cat。
@ApiBody({
  type: Cat
})
async upateUser(@Body() dto: UserDTO) {
  // ...
}
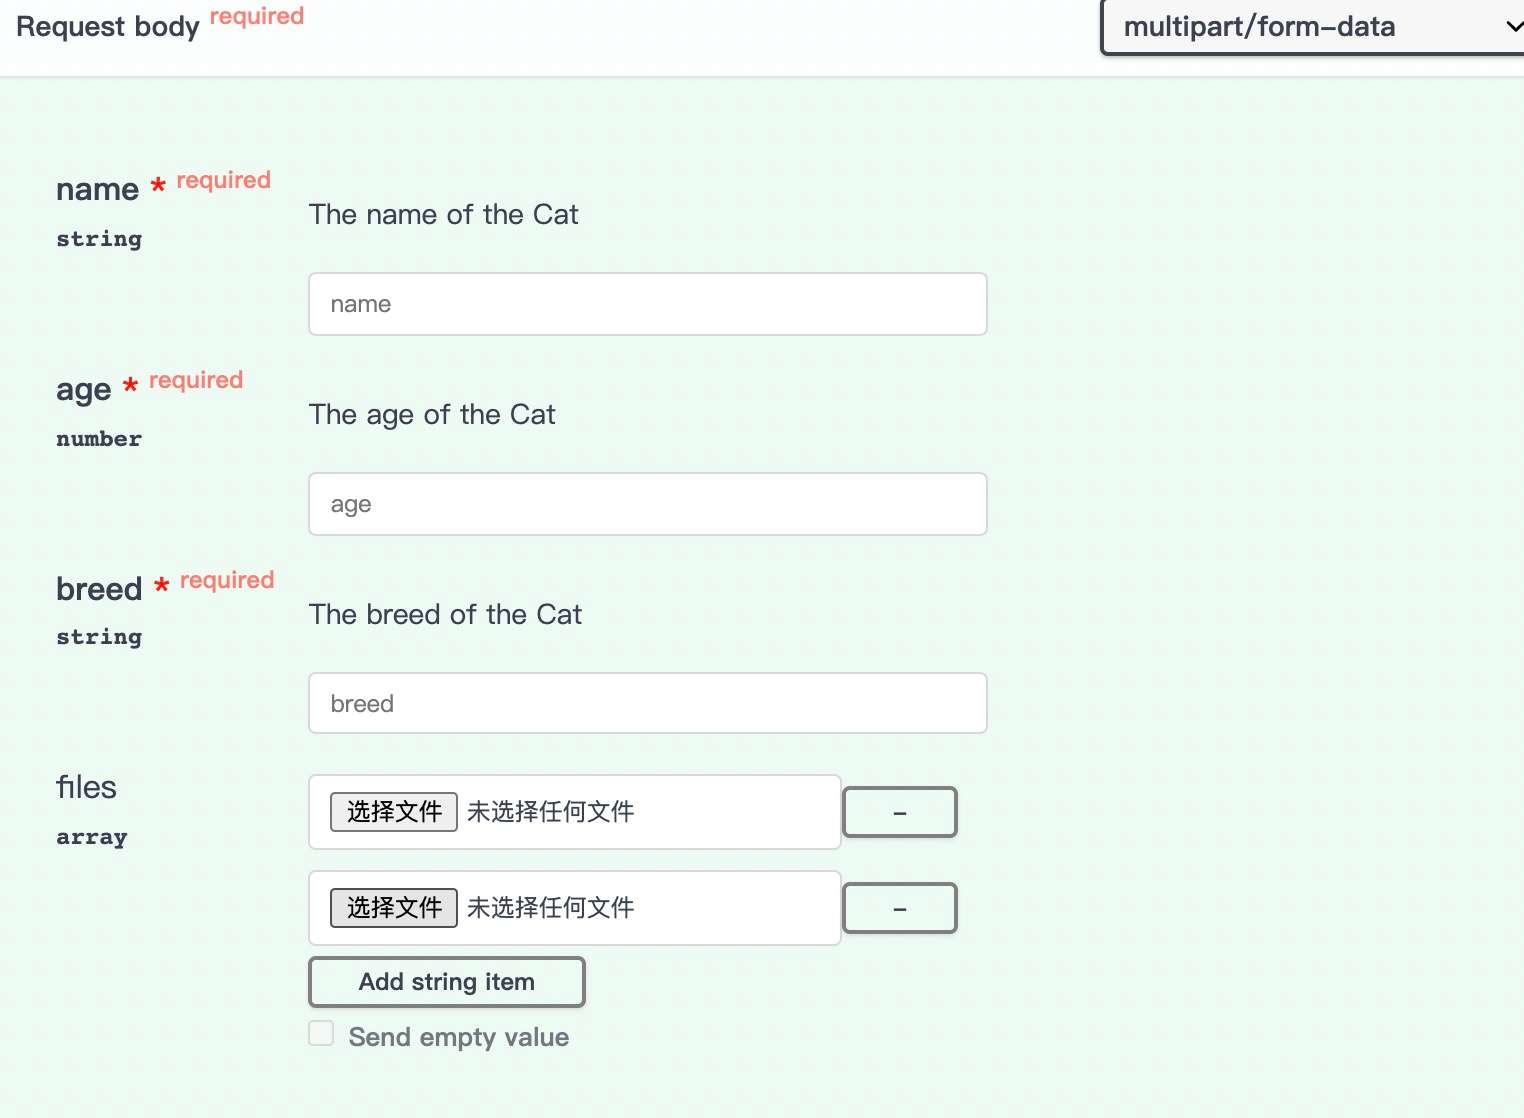
文件上传定义
文件上传是 Post 请求中较为特殊的一类场景。
可以通过在 DTO 中定义属性来实现多个文件以及 Fields 的类型。
import { ApiProperty, BodyContentType } from "@midwayjs/swagger";

export class CreateCatDto {
  // ...
  @ApiProperty({
    type: 'array',
    items: {
      type: 'string',
      format: 'binary',
    }
  })
  files: any;
}

// ...

@Post('/test1')
@ApiBody({
  contentType: BodyContentType.Multipart,
  schema: {
    type: CreateCatDto,
  }
})
async upload1(@Files() files, @Fields() fields) {
  // ...
}
Swagger UI 中展示:
如果不需要多个文件,使用 schema 定义即可。
export class CreateCatDto {
  // ...
  @ApiProperty({
    type: 'string',
    format: 'binary',
  })
  file: any;
}
Swagger UI 中展示:

请求 Header
通过 @ApiHeader({...}) 装饰器来定义 Header 参数。
@ApiHeader({
  name: 'x-test-one',
  description: 'this is test one'
})
@ApiTags(['hello'])
@Controller('/hello')
export class HelloController {}

请求 Response
可以使用 @ApiResponse({...}) 来自定义请求 Response。
@Get('/:id')
@ApiResponse({
  status: 200,
  description: 'The found record',
  type: Cat,
})
findOne(@Param('id') id: string, @Query('test') test: any): Cat {
  return this.catsService.findOne(+id);
}
还提供了其他不需要设置 status 的装饰器:
@ApiOkResponse()@ApiCreatedResponse()@ApiAcceptedResponse()@ApiNoContentResponse()@ApiMovedPermanentlyResponse()@ApiBadRequestResponse()@ApiUnauthorizedResponse()@ApiNotFoundResponse()@ApiForbiddenResponse()@ApiMethodNotAllowedResponse()@ApiNotAcceptableResponse()@ApiRequestTimeoutResponse()@ApiConflictResponse()@ApiTooManyRequestsResponse()@ApiGoneResponse()@ApiPayloadTooLargeResponse()@ApiUnsupportedMediaTypeResponse()@ApiUnprocessableEntityResponse()@ApiInternalServerErrorResponse()@ApiNotImplementedResponse()@ApiBadGatewayResponse()@ApiServiceUnavailableResponse()@ApiGatewayTimeoutResponse()@ApiDefaultResponse()
HTTP 请求返回的数据模型定义也可以通过指定 type,当然这个数据模型需要通过装饰器 @ApiProperty 来描述各个字段。
import { ApiProperty } from '@midwayjs/swagger';

export class Cat {
  @ApiProperty({ example: 'Kitty', description: 'The name of the Cat'})
  name: string;

  @ApiProperty({ example: 1, description: 'The age of the Cat' })
  age: number;

  @ApiProperty({
    example: 'Maine Coon',
    description: 'The breed of the Cat',
  })
  breed: string;
}
Swagger 还支持带前缀 x- 的扩展字段,可以使用 @ApiExtension(x-..., {...}) 装饰器。
@ApiExtension('x-hello', { hello: 'world' })
当不希望通过 type 来定义 model 类型时,我们可以通过在 Controller 中或者 Model Class 中加入 @ApiExtraModel 来增加额外的 schema 类型描述。
@ApiExtraModel(TestExtraModel)
@Controller()
class HelloController {
  @Post('/:id', { summary: 'test'})
  @ApiResponse({
    status: 200,
    content: {
      'application/json': {
        schema: {
          properties: {
            data: { '$ref': getSchemaPath(TestExtraModel)}
          }
        }
      }
    }
  })
  async create(@Body() createCatDto: CreateCatDto, @Param('id') id: number): Promise<Cat> {
    return this.catsService.create(createCatDto);
  }
}

// or
@ApiExtraModel(TestExtraModel)
class TestModel {
  @ApiProperty({
    item: {
      $ref: getSchemaPath(TestExtraModel)
    },
    description: 'The name of the Catage'
  })
  one: TestExtraModel;
}
泛型返回数据
Swagger 本身不支持泛型数据,泛型作为 Typescript 的一种类型,会在构建期抹掉,在运行时无��法读取。
我们可以用一些取巧的方式来定义。
比如,我们需要将返回值增加一些通用的包裹结构。
{
  code: 200,
  message: 'xxx',
  data: any
}
为此,我们可以编写一个方法,入参是返回的 data,返回一个包裹的类。
import { Type } from '@midwayjs/swagger';

type Res<T> = {
  code: number;
  message: string;
  data: T;
}

export function SuccessWrapper<T>(ResourceCls: Type<T>): Type<Res<T>> {
  class Successed {
    @ApiProperty({ description: '状态码' })
    code: number;

    @ApiProperty({ description: '消息' })
    message: string;

    @ApiProperty({
      type: ResourceCls,
    })
    data: T;
  }

  return Successed;
}
我们可以基于这个方法,来实现我们自己的返回类。
class ViewCat extends SuccessWrapper<Cat>(Cat) {}
在使用的时候,可以直接指定这个类即可。
@Get('/:id')
@ApiResponse({
  status: 200,
  description: 'The found record',
  type: ViewCat,
})
async findOne(@Param('id') id: string, @Query('test') test: any): ViewCat {
  // ...
}
更多的定义示例
Swagger 中还有更多的写法,框架都进行了支持,更多用法可以查看我们的 测试用例。
更多配置
路由标签
Swagger 可以对每个路由添加标签,进行分组。
标签添加有两种形式。
- 添加到控制器
- @ApiTags 和 @ApiOperation
默认情况下,框架会根据 Controller 的路径来生成标签,比如下面的代码,会生成一个 hello 的标签,这个标签会应用到这个控制器所有的路由上。
@Controller('/hello')
export class HelloController {}
如果需要自定义标签,可以通过 @ApiTags([...]) 来自定义 Controller 标签。
@ApiTags(['hello'])
@Controller('/hello')
export class HelloController {}
从 v3.17.3 开始,可以通过配置 isGenerateTagForController 来控制是否自动生成 Controller 标签。
// src/config/config.default.ts
export default {
  swagger: {
    isGenerateTagForController: false
  }
}
可以将 @ApiTags 标签直接加在路由方法上。
// ...
export class HomeController {
  @ApiTags(['bbb'])
  @Get('/')
  async home(): Promise<string> {
    // ...
  }
}
也可以通过 @ApiOperation 来添加标签。
// ...
export class HomeController {
  @ApiOperation({ tags: ['bbb'] })
  @Get('/')
  async home(): Promise<string> {
    // ...
  }
}
@ApiTags 的优先级比 @ApiOperation 更高,如果两者同时存在,@ApiTags 会覆盖 @ApiOperation。
同理,路由上的 @ApiTags 也会覆盖控制器上的 @ApiTags。
可以通过配置给 Tag 添加描述。
// src/config/config.default.ts

export default {
  swagger: {
    tags: [
      {
        name: 'api',
        description: 'API Document'
      },
      {
        name: 'hello',
        description: 'Other Router'
      },
    ]
  }
}
授权验证
组件可以通过添加授权验证配置来设置验证方式,我们支持配置 basic、bearer、cookie、oauth2、apikey、custom。
basic
启用 basic 验证
// src/config/config.default.ts
export default {
  // ...
  swagger: {
    auth: {
      authType: 'basic',
    },
  },
}
关联 Controller
@ApiBasicAuth()
@Controller('/hello')
export class HelloController {}
bearer
启用 bearer 验证(bearerFormat 为 JWT)
// src/config/config.default.ts
export default {
  // ...
  swagger: {
    auth: {
      authType: 'bearer',
    },
  },
}
关联 Controller
@ApiBearerAuth()
@Controller('/hello')
export class HelloController {}
oauth2
启用 oauth2 验证
// src/config/config.default.ts
export default {
  // ...
  swagger: {
    auth: {
      authType: 'oauth2',
      flows: {
        implicit: {
          authorizationUrl: 'http://example.org/api/oauth/dialog',
          scopes: {
            'write:pets': 'modify pets in your account',
            'read:pets': 'read your pets'
          }
        },
        authorizationCode: {
          authorizationUrl: 'https://example.com/api/oauth/dialog',
          tokenUrl: 'https://example.com/api/oauth/token',
          scopes: {
            'write:pets': 'modify pets in your account',
            'read:pets': 'read your pets'
          }
        },
      },
    },
  },
}
关联 Controller
@ApiOAuth2()
@Controller('/hello')
export class HelloController {}
cookie
启用 cookie 验证
// src/config/config.default.ts
export default {
  // ...
  swagger: {
    auth: {
      authType: 'cookie',
      securityName: 'testforcookie',
      cookieName: 'connect.sid',
    },
  },
}
关联 Controller
@ApiCookieAuth('testforcookie')
@Controller('/hello')
export class HelloController {}
apikey
启用 cookie 验证
// src/config/config.default.ts
export default {
  // ...
  swagger: {
    auth: {
      authType: 'apikey',
    	name: 'api_key'
    },
  },
}
关联 Controller
@ApiSecurity('api_key')
@Controller('/hello')
export class HelloController {}
custom 验证
自定义验证方式,需要自己设计参数配置
// src/config/config.default.ts
export default {
  // ...
  swagger: {
    auth: {
      authType: 'custom',
      name: 'mycustom'
      // ...
    },
  },
}
关联 Controller
@ApiSecurity('mycustom')
@Controller('/hello')
export class HelloController {}
忽略路由
配置 @ApiExcludeController 可以忽略整个 Controller 的路由。
@ApiExcludeController()
@Controller('/hello')
export class HelloController {}
配置 @ApiExcludeEndpoint 可以忽略单个路由。
@Controller('/hello')
export class HelloController {

  @ApiExcludeEndpoint()
  @Get()
  async getUser() {
    // ...
  }
}
如果需要满足更加动态的场景,可以通过配置路由过滤器来批量过滤。
// src/config/config.default.ts
import { RouterOption } from '@midwayjs/core';

export default {
  // ...
  swagger: {
    routerFilter: (url: string, options: RouterOption) => {
      return url === '/hello/getUser';
    }
  },
}
routerFilter 用来传入一个过滤函数,包含 url 和 routerOptions 两个参数。routerOptions 中包含了路由基础信息。
每当匹配到一个路由时,会自动执行 routerFilter 方法,当 routerFilter 返回 true 时,代表这个路由将会被过滤。
完整参数配置
Swagger 组件提供了和 OpenAPI 一致的参数配置能力,可以通过自定义配置来实现。
配置项如下:
/**
 * see https://swagger.io/specification/
 */
export interface SwaggerOptions {
  /**
   * 默认值: My Project
   * https://swagger.io/specification/#info-object title 字段
   */
  title?: string;
  /**
   * 默认值: This is a swagger-ui for midwayjs project
   * https://swagger.io/specification/#info-object description 字段
   */
  description?: string;
  /**
   * 默认值: 1.0.0
   * https://swagger.io/specification/#info-object version 字段
   */
  version?: string;
  /**
   * https://swagger.io/specification/#info-object contact 字段
   */
  contact?: ContactObject;
  /**
   * https://swagger.io/specification/#info-object license 字段
   */
  license?: LicenseObject;
  /**
   * https://swagger.io/specification/#info-object termsOfService 字段
   */
  termsOfService?: string;
  /**
   * https://swagger.io/specification/#openapi-object externalDocs 字段
   */
  externalDocs?: ExternalDocumentationObject;
  /**
   * https://swagger.io/specification/#openapi-object servers 字段
   */
  servers?: Array<ServerObject>;
  /**
   * https://swagger.io/specification/#openapi-object tags 字段
   */
  tags?: Array<TagObject>;
  /**
   * 可以参考 https://swagger.io/specification/#security-scheme-object
   */
  auth?: AuthOptions | AuthOptions[];
  /**
   * 默认值: /swagger-ui
   * 访问 swagger ui 的路径
   */
  swaggerPath?: string;
  /**
   * 对路由 tag 进行 ascii 排序
   * 可以使用 1-xxx、2-xxx、3-xxx 来定义 tag
   */
  tagSortable?: boolean;
  /**
   * UI 展示中需要用到的配置
   * 可以参考 https://github.com/swagger-api/swagger-ui/blob/master/docs/usage/configuration.md#display
   */
  displayOptions?: {
    deepLinking?: boolean;
    displayOperationId?: boolean;
    defaultModelsExpandDepth?: number;
    defaultModelExpandDepth?: number;
    defaultModelRendering?: 'example' | 'model';
    displayRequestDuration?: boolean;
    docExpansion?: 'list' | 'full' | 'none';
    filter?: boolean | string;
    maxDisplayedTags?: number;
    showExtensions?: boolean;
    showCommonExtensions?: boolean;
    useUnsafeMarkdown?: boolean;
    tryItOutEnabled?: boolean;
  };

  documentOptions?: {
    /**
     * 自定义 operationIdFactory,用于生成 operationId
     * @default () => controllerKey_webRouter.methodKey
     */
    operationIdFactory?: (
      controllerKey: string,
      webRouter: RouterOption
    ) => string;
  };
}

/**
 * 继承自 https://swagger.io/specification/#security-scheme-object
 */
export interface AuthOptions extends Omit<SecuritySchemeObject, 'type'> {
  /**
   * 验权类型
   * basic  => http basic 验证
   * bearer => http jwt 验证
   * cookie => cookie 方式验证
   * oauth2 => 使用 oauth2
   * apikey => apiKey
   * custom => 自定义方式
   */
  authType: AuthType;
  /**
   * https://swagger.io/specification/#security-scheme-object type 字段
   */
  type?: SecuritySchemeType;
  /**
   * authType = cookie 时可以修改,通过 ApiCookie 装饰器关联的名称
   */
  securityName?: string;
  /**
   * authType = cookie 时可以修改,cookie 的名称
   */
  cookieName?: string;
}
装饰器列表
组件所有装饰器参考了 @nestjs/swagger 的设计,都带 Api 前缀。这里列出全部装饰器:
| 装饰器 | 支持模式 |
|---|---|
@ApiBody | Method |
@ApiExcludeEndpoint | Method |
@ApiExcludeController | Controller |
@ApiHeader | Controller/Method |
@ApiHeaders | Controller/Method |
@ApiOperation | Method |
@ApiProperty | Model Property |
@ApiPropertyOptional | Model Property |
@ApiResponseProperty | Model Property |
@ApiQuery | Method |
@ApiResponse | Method |
@ApiTags | Controller/Method |
@ApiExtension | Method |
@ApiBasicAuth | Controller |
@ApiBearerAuth | Controller |
@ApiCookieAuth | Controller |
@ApiOAuth2 | Controller |
@ApiSecurity | Controller |
@ApiExcludeSecurity | Method |
@ApiParam | Method |
@ApiExtraModel | Controller |
UI 渲染
从 Swagger-ui-dist 渲染
默认情况下,如果安装了 swagger-ui-dist 包,组件会默认会调用 renderSwaggerUIDist 渲染 swagger ui,如果需要传递 swagger-ui 的 options,可以 通过 swaggerUIRenderOptions 选项。
// src/config/config.default.ts
import { renderSwaggerUIDist } from '@midwayjs/swagger';

export default {
  // ...
  swagger: {
    swaggerUIRender: renderSwaggerUIDist,
    swaggerUIRenderOptions: {
      // ...
    }
  },
}
如果希望调整 UI 的配置,可以使用自定义文件的方式替换默认的 swagger-initializer.js。
// src/config/config.default.ts
import { AppInfo } from '@midwayjs/core';
import { renderSwaggerUIDist } from '@midwayjs/swagger';
import { join } from 'path';

export default (appInfo: AppInfo) {
  return {
    // ...
    swagger: {
      swaggerUIRender: renderSwaggerUIDist,
      swaggerUIRenderOptions: {
        customInitializer: join(appInfo.appDir, 'resource/swagger-initializer.js'),
      }
    },
  }
}
自定义的 swagger-initializer.js 内容大致如下:
window.onload = function() {
  window.ui = SwaggerUIBundle({
    url: "/index.json",
    dom_id: '#swagger-ui',
    deepLinking: true,
    presets: [
      SwaggerUIBundle.presets.apis,
      SwaggerUIStandalonePreset
    ],
    plugins: [
      SwaggerUIBundle.plugins.DownloadUrl
    ],
    layout: "StandaloneLayout",
    persistAuthorization: true,
  });
};
其中的 url 指向当前的 swagger json,可以自行修改,完整的 swagger-ui 配置请参考 这里。
从 unpkg 等 CDN 地址渲染
如果未安装 swagger-ui-dist 包,会自动使用 renderSwaggerUIRemote 方法进行渲染,默认由 unpkg.com 提供 cdn 资源。
// src/config/config.default.ts
import { renderSwaggerUIRemote } from '@midwayjs/swagger';

export default {
  // ...
  swagger: {
    swaggerUIRender: renderSwaggerUIRemote,
    swaggerUIRenderOptions: {
      // ...
    }
  },
}
仅提供 Swagger JSON
如果仅希望提供 Swagger JSON,可以配置 renderJSON 仅渲染 JSON ,无需引入 swagger-ui-dist 包。
// src/config/config.default.ts
import { renderJSON } from '@midwayjs/swagger';

export default {
  // ...
  swagger: {
    swaggerUIRender: renderJSON,
  },
}
常见问题
@Get 等路由注解中的 summary 或者 description 不生效
当存在 @ApiOperation 时候,将优先使用 @ApiOperation 中的 summary 或者 description,所以在 @ApiOperation 与 @Get 等路由注解中,只需要写一个即可。